For the connection, the quick connectors are the means of choice. For assembly, the front clamp of the quick connector is in need. Then the LED strip is passed through so that the copper conductors come to rest entirely and flush under the two or four counter poles, the connector’s pins.
How many amps do LED strips need?
Let’s take a typical RGB LED strip with 14.4 watts per meter as an example. At 14.4W/m, 1.2 amps of current flow at 12 volts, while at 24V, it is only 0.6 amps.
How many watts per meter of an LED?
For a total length of 4.5 m LED strips and four watts/m, that’s about 18 watts. It would help if you left a 10-20% power reserve for the LED power supply to feel comfortable for a long time. The recommendation for the previous example is a 20 or even better 30-watt power supply.
1. Measure the space where you are going to hang the strip.
2. Cut the necessary length according to the space where it will be installed. Cut the strip in the marked places according to the model.
3. Clean the surface where the strip will be glued, remove the adhesive protector from the back, and glue it in the selected area.
4. Connect the end of the strip to the connector, which in turn to the power supply. If the length that we will put is superior to the 8 meters, we will have to install a power amplifier so that the signal arrives well to the whole strip.
5. Connect the power supply, and that’s it. The power supply of the LED strip will be like the total of watts (W) that has the section that we are going to install. We will have to take into account the power of the controller and the amplifier.

Cutting, soldering, and splicing sections of LED strips
Cutting LED strips: LED strips must always be cut along the division lines marked on the strip with scissors. The cuts will be made depending on the model of the LED strip. The remaining sections can still be used by simply soldering connecting wires to the split end.
Soldering LED strips: All split strips contain marked lines to be soldered together. Be careful that the soldering iron maintains brief contact with the strip when soldering, as excessive heat will damage the conductor, resulting in the strip not functioning.
Connectors for RGB LED strips are 4 pin (some special ones can use up to 6 connectors), while single color LED strips use 2 pin connectors and dual white stripes use 3 connectors.
See rigid connectors and patch cables for splicing between RGB and Monochrome strips.
When is it necessary to use an amplifier?
In an installation, whenever we are going to use a controller (single color or RGB), and the length is more than 8 meters, we will need an amplifier every 8 meters so that both the signal and the intensity reach perfectly to the entire LED strip. As a general rule, installing a controller in single-color LED strips is not necessary, but if we want to control the light intensity, we will need it.
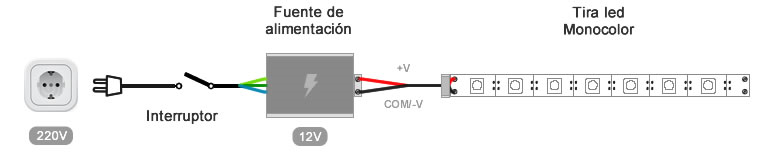
Installation examples for single-color LED strips.
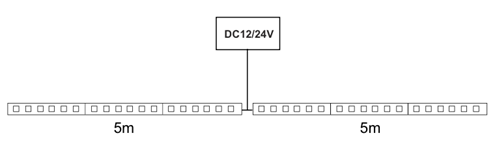
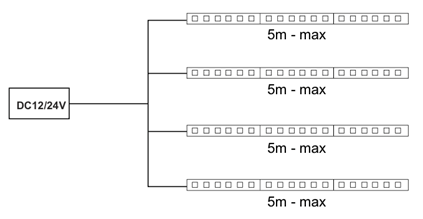
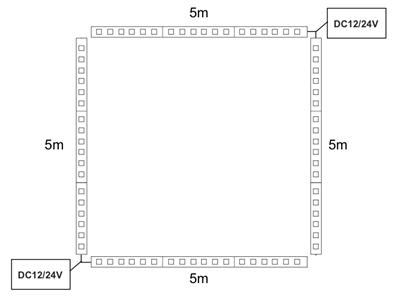
To not have voltage drops and the LED strip is illuminated equally in all sections, it is advisable not to exceed 5 meters in length per section. Between the power supply and the LED strip, the maximum size of the cable is 3 meters. If it is necessary to extend this length, we will use a cable of a greater section to avoid voltage drops.
A. Installation of 2 single-color LED strips to a power supply.
B. Basic installation of single color strips

C. Installation of 4 strips forming a square
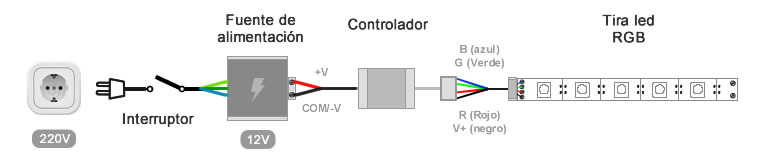
Installation examples for RGB LED strips.
To avoid voltage drops and ensure that the LED strip lights up equally in all sections, it is advisable not to exceed 5 meters in length per section.
Between the power supply and the LED strip, the maximum length of the cable is 3 meters. If it is necessary to extend this length, we will use a cable of a greater section to avoid voltage drops.
Check the technical specifications of the controller and LED strips to be used in the installation to know the maximum number of meters of a strip that the controller can support.